The other day, a friend said to me, “I know this might sound silly, but could you teach me how to attach two boards together?” She wants to build a bookshelf eventually, but needs to start at the beginning. I started to answer quickly and then stopped, recognizing that it wasn’t a silly question at all and I needed to think through how I would teach what exactly goes into attaching one board to another. I can do it without thinking on my own, but I’m fluent in hardware. Her question asked me to go back to the nuts and bolts of building.
I grew up in my grandmother’s hardware store, where I was taught by white-mustached Texan men how to select the right bolt for the job, how to cut and thread pipe, how to measure twice and cut lumber once. Later, I was one of the few women working in construction and landscaping when I lived in Philadelphia. According to the 2024 US Bureau of Labor Statistics survey, tradeswomen still only make up about 4.3 percent of all construction trade workers.
Most projects start with a trip to the hardware store, which can be daunting if you’re not sure what exactly you’re looking for or how to navigate the aisles with confidence. Luckily for us in Granby, we have a rare gem in Beman Hardware: family-owned for three generations, spanning 86 years, before being passed on to a longtime employee. The beauty of small hardware stores is that you can be sure folks are able to answer your questions, know exactly where the item is and what to do with it.
We’ll begin at the beginning and answer my friend’s question. How to fasten one board to another, almost like a shelf:
• Let’s start with two 1” thick pine boards—4” wide at most to learn on, and of equal length
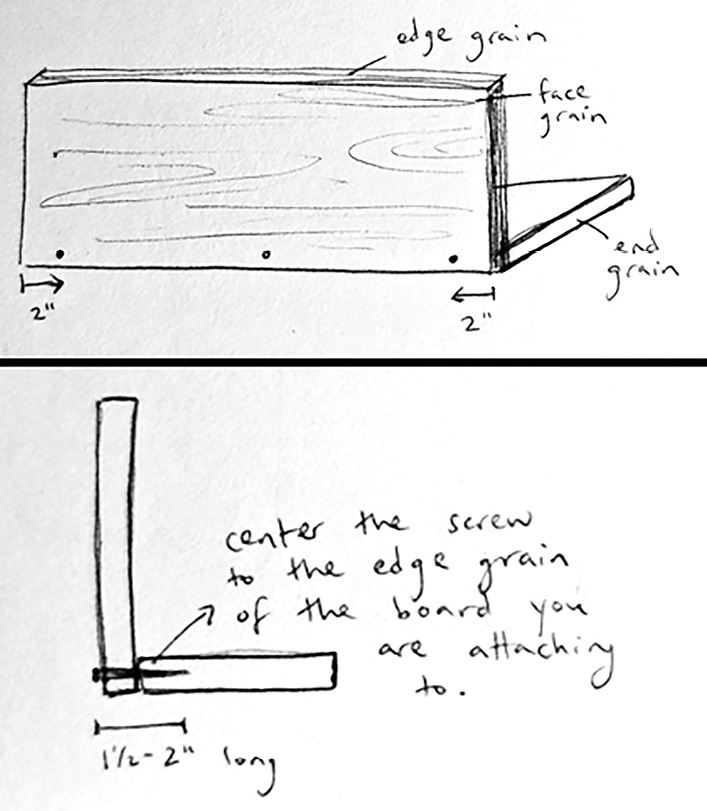
• Line up the boards perpendicular to one another—one flat and one upright—with long edges butted up against each other. This may be easiest on a table or other raised surface to get your screws in straight. See diagram.
• You’ll be putting a fastener through the face grain of one board first, and screwing it into the edge grain of the other board. This means that pre-drilling a hole is important to avoid splitting the wood.
• Pre-drill your first hole around 2” away from one end, keeping everything squared and tight so the screw will be centered in the narrow edge grain side, and screw your first wood screw in! Choose a #8 screw that is at least 1 ½–2” long. Do the same thing at the other end of the board. Depending on how long your boards are, feel free to toss a couple more screws in along the board, now that you’re a pro.
This column is for all the Jills in Granby who want to gain confidence in their how-to skills and feel empowered to take on projects of different scales. In a few months, we’ll be building our own kitchen tables and bookshelves here.
Do you have a question about hardware and how-to that you’d like answered here? Send it along to editor@granbydrummer.org with the subject line “Jill-of-all-trades.”